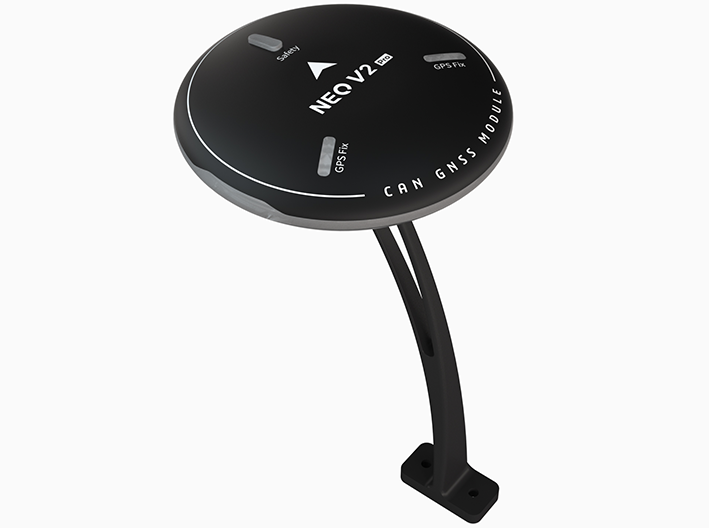
NEO V2 Pro GPS
NEO V2 pro 是 CUAV 开发的 DroneCAN 标准 GPS。它集成了工业级指南针、气压计、自动驾驶状态指示灯、蜂鸣器和安全开关于一体。它具有安全性高、抗干扰能力强等特点。
备注
ArduPilot 4.0 固件(及更高版本)支持 NEO V2 pro。
主要功能
处理器
STM32F412
传感器
指南针:RM3100
气压计:MS5611
RTK 接收器
Ublox M8N
GNSS 波段
GPS/QZSS L1 C/A、GLONASS L10F、BeiDou B1I、Galileo E1B/C、SBAS L1 C/A:WAAS、EGNOS、MSAS、GAGAN
导航更新率
RTK 高达 10HZ
位置精度
2M
收购
冷启动 26 秒
辅助启动 1 秒
重新获得 2 s
敏感性
跟踪和导航 -167 dBm
冷启动 -148 dBm
重新获取 -160 dBm
规程
支持
接口类型
GHR-04V-S
输入电压
5V
工作温度
-10~70℃
尺寸
60x60x16 毫米
重量
33g
购买
您可以从 CUAV 商店.
连接至 CUAV v5+
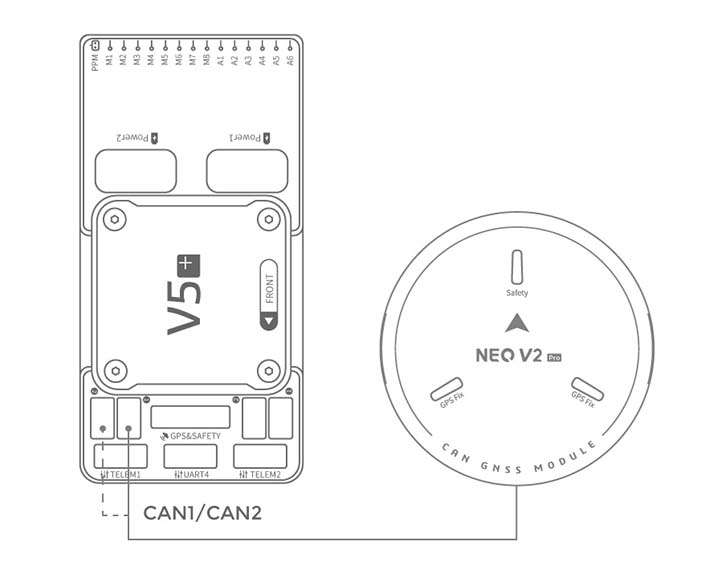
备注
与其他(飞行)控制器的连接也类似。
启用 CAN 端口、DroneCAN 和配置 NEO-V2 Pro
参见 CAN 总线设置 和 DroneCAN 设置 了解更多信息。
在Mission Planner地面站的所有参数表中设置以下参数,并在写入后重新启动
CAN_P1_DRIVER 设为 1。
CAN_P2_DRIVER 设为 1。
can_d1_protocol 设为 1。
can_d2_protocol 设为 1。
NTF_LED_TYPES 设置为 231。
GPS1_TYPE 设置为 9。
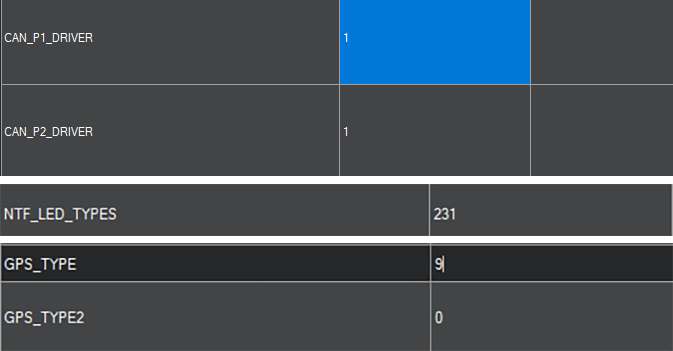
NEO-V2 现已可投入运行
SLCAN 接口
如果需要设置 NEO V2 PRO 或升级其固件,则需要启用 SLCAN。
备注
ArduPilot 4.0 或更高版本的固件支持 SLCAN。
请将 NEO V2 pro 连接到(飞行)控制器的 CAN1 接口。
打开Mission Planner地面站并连接(飞行)控制器。
在Mission Planner地面站的 "全参数 "选项卡中修改以下参数。
用于 CUAV V5+/nano:
can_slcan_cport 设为 1
serial7_protocol 设为 22
重启(飞行)控制器
备注
运行 ArduPilot4.0 或更高版本固件的 CUAVV5 / NANO / FMUV5 (飞行)控制器将有两个 USB 接口,一个是运行 MAVLINK 的(飞行)控制器控制台端口 (SERIAL0),另一个是 SLCAN 接口端口;如果 Mission Planner Comm Port 下拉框中没有显示两个端口,请卸载驱动程序并重新安装。如果仍有问题,请参阅 复合连接故障排除
用于 Pixhawk 系列 / FMUv2 / FMU V3 / FMU V4
can_slcan_cport 设置为 1
can_slcan_timout 设置为 0(无超时,重启后恢复正常运行)
can_slcan_sernum 设置为 0
在操作完成之前,请不要重新启动(飞行)控制器。
备注
STM32F4 不支持双虚拟 USB 端口,因此使用 STM32F4 处理器的(飞行)控制器只能在 USB 上的 MAVLink 连接关闭后才能用于 SLCAN;写入上述设置后,USB 接口将变为 SCLAN 端口;重启后可再次进行 MAVLink 连接。在此之前,USB 连接可用于 SLCAN 操作。
NEO-V2 内部配置
ArduPilot 支持通过 SLCAN 设置 DroneCAN 设备的内部设置,如修改节点 ID、启用/禁用气压计等。
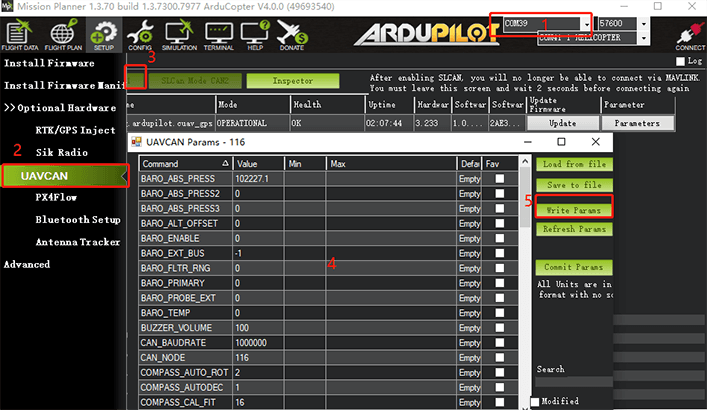
选择与 SLCAN 对应的 COMM 端口。
选择初始设置>可选硬件选项卡下的 DroneCAN 部分。
单击 "SLCAN NODE CAN1 "并
点击 "检查员
更改 DroneCAN 设备的配置参数
启用气压计
Baro_enabled=1, 0=禁用
重新启动
修改设备 ID
修改 CAN_NODE 参数
升级固件
方法一: 使用Mission Planner地面站进行固件升级
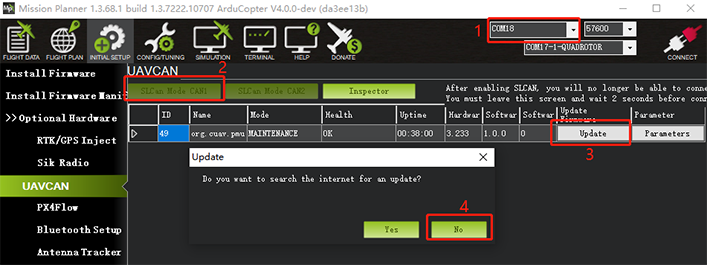
选择与 SLCAN 对应的 COMM 端口。
单击初始设置>可选硬件选项卡下 DroneCAN 部分的 "SLCAN NODE CAN1"。
点击 "更新
在弹出的提示框中选择 "NO"(Tes 选择在线固件;No 选择本地固件)。
选择固件文件。
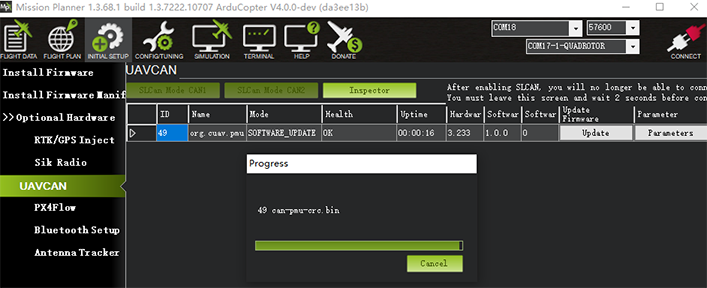
等待闪存进程完成。
方法二
使用 DroneCAN GUI TOOL 软件进行升级
选择与 SLCAN 相对应的设备端口,然后单击 "确定"。

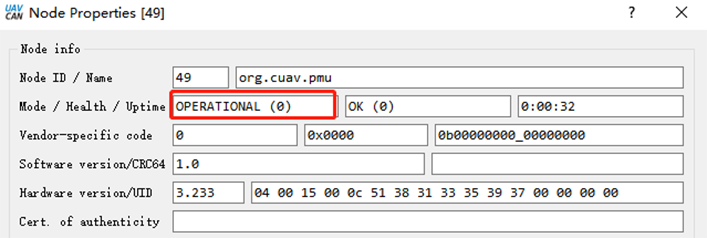
单击"√";然后双击设备信息(如下图 2 所示)。
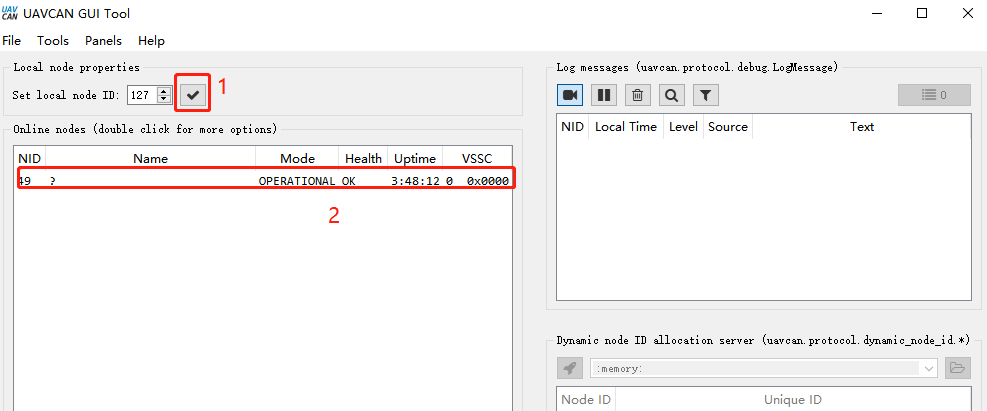
点击 "更新固件",消息框会弹出 "是"。
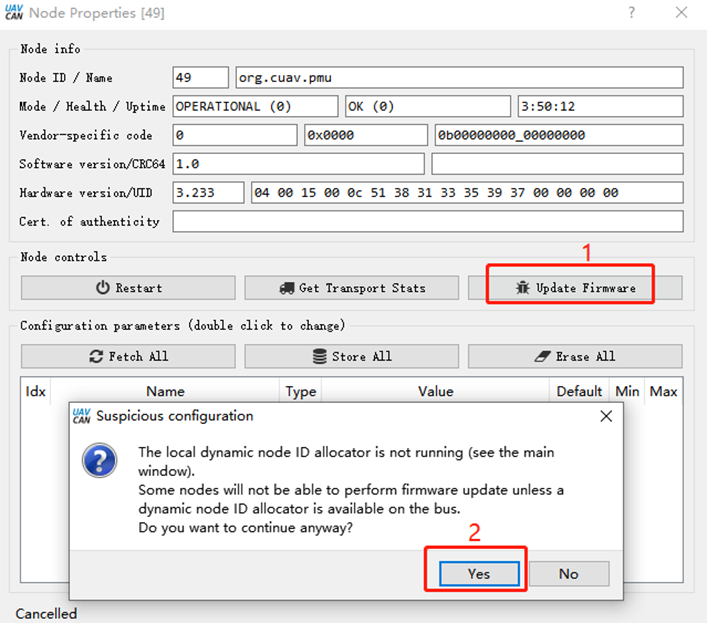
mode/heakth/uptime 条目变为 "SOftware_update"。

等待固件写入完成。