连接电调和电机
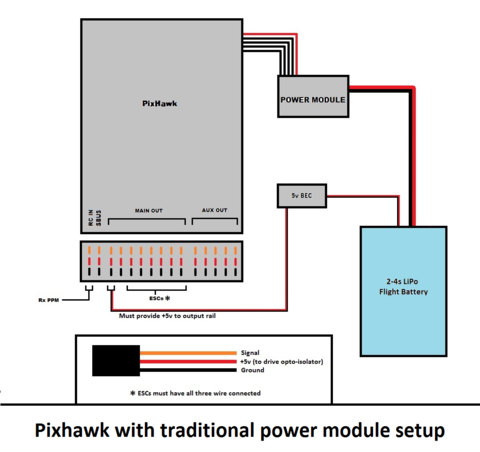
本文介绍如何将电调、电机和螺旋桨连接到(飞行)控制器。以 Pixhawk 为例,其他(飞行)控制器的连接方式与此类似。
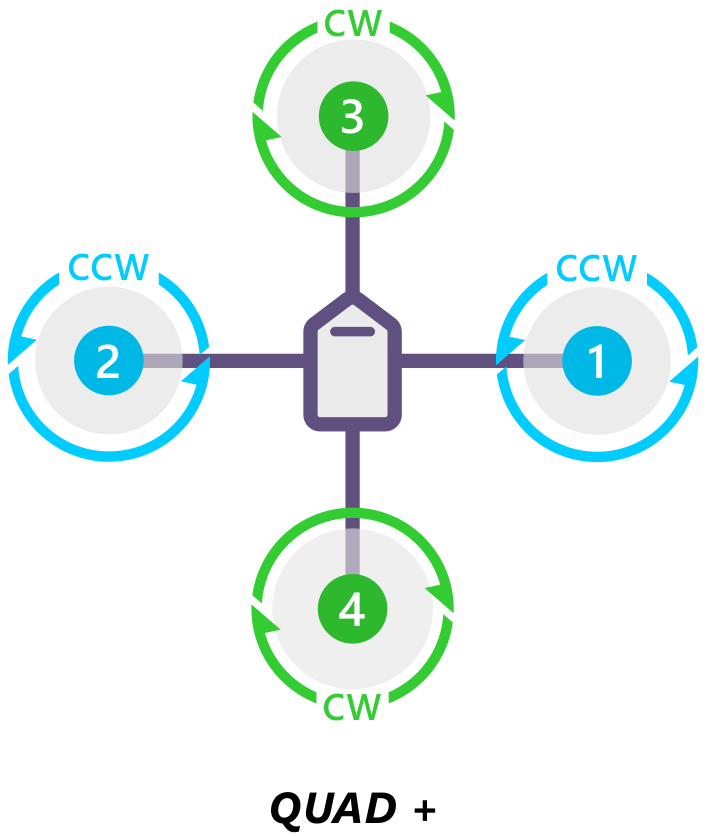
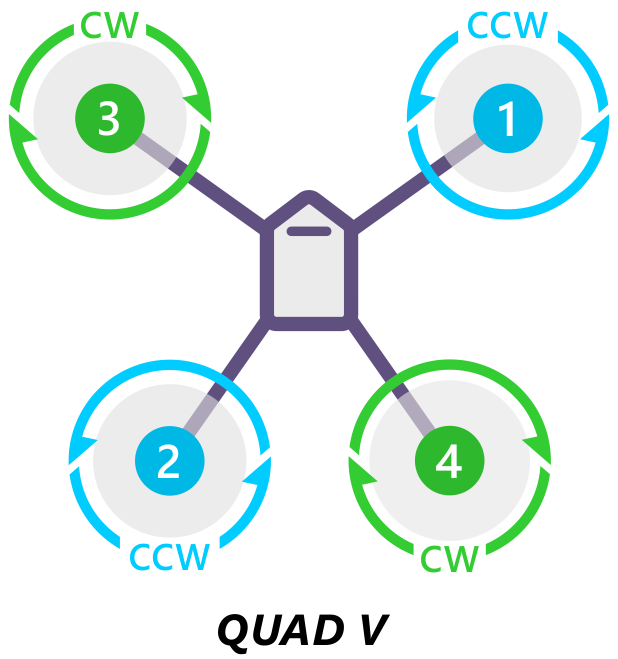
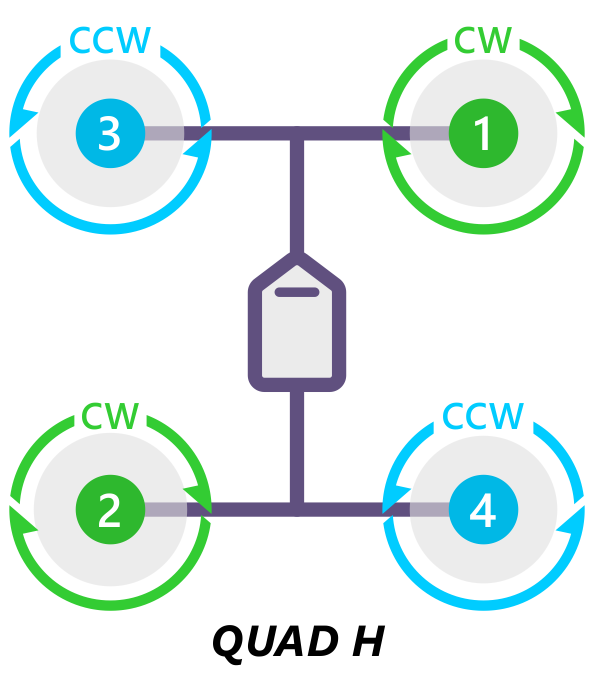
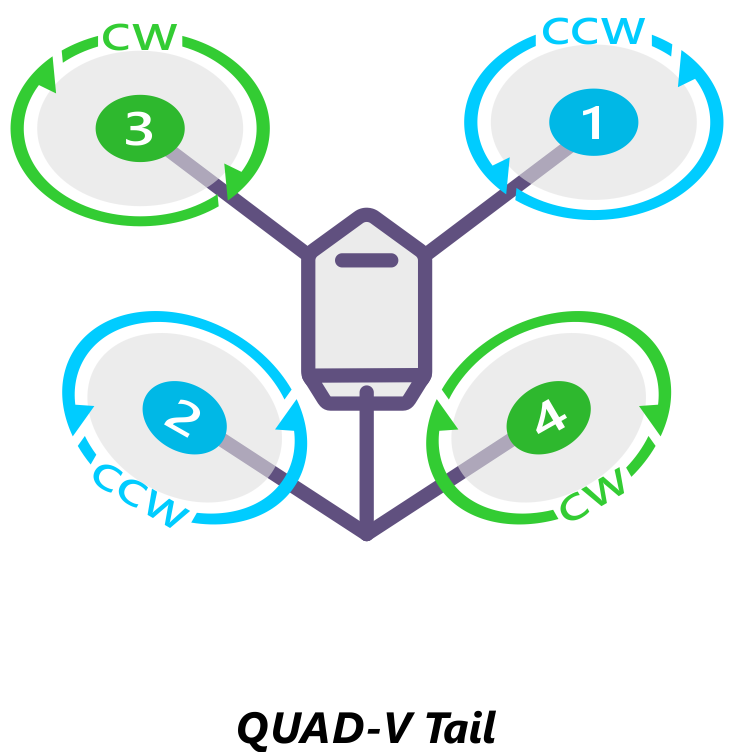
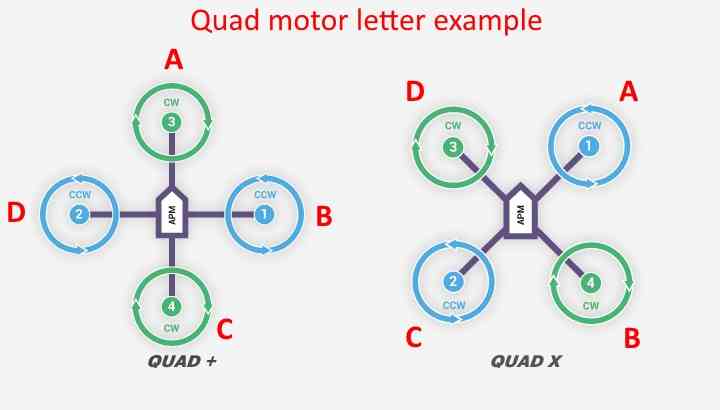
按电机编号将每个电调的电源线 (+)、接地线 (-) 和信号线 (s) 连接至(飞行)控制器的主输出引脚。请在下面查找您的机架类型,以确定电机的分配顺序。

Pixhawk 输出引脚(已编号)。前 4 个引脚用颜色编码,用于连接四框架
电机顺序图
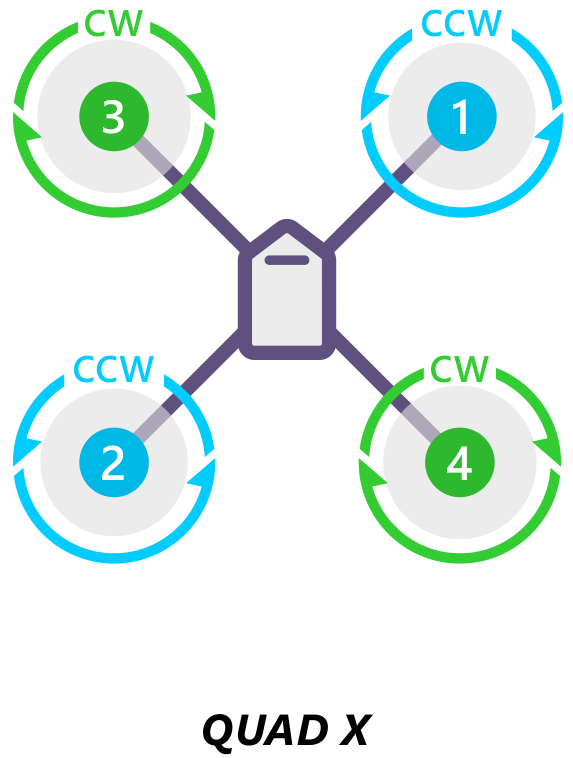
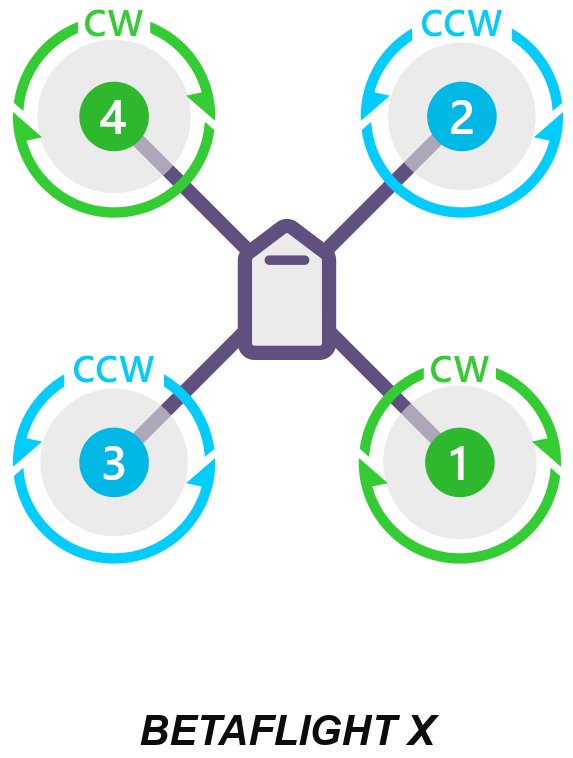
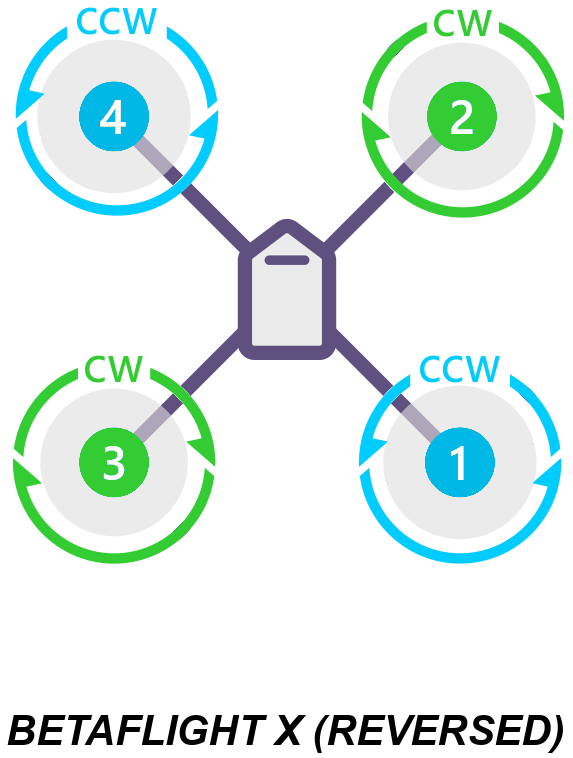
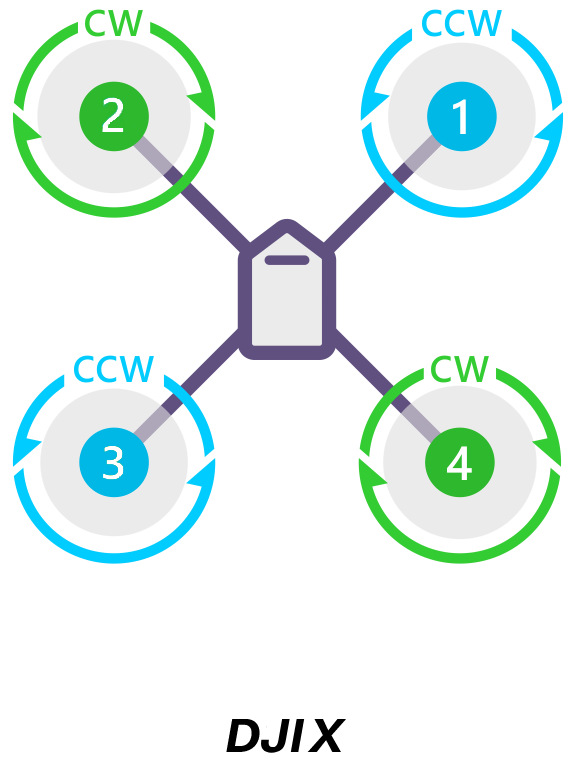
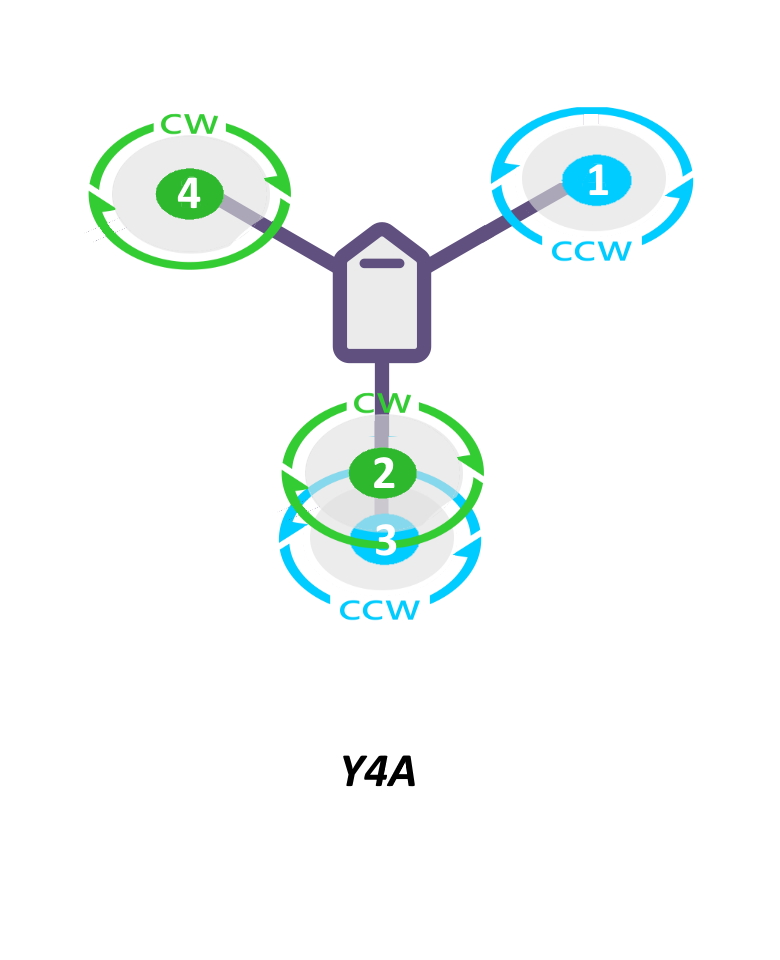
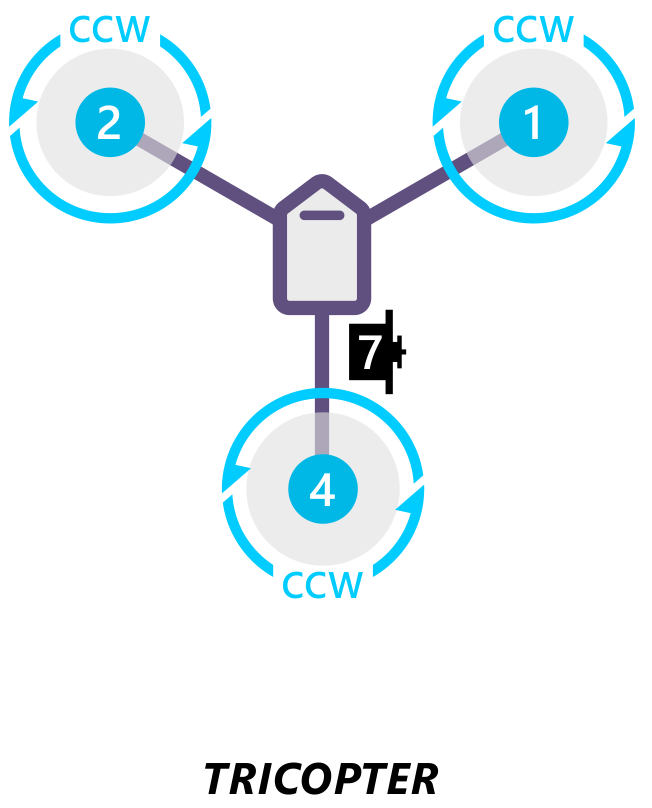
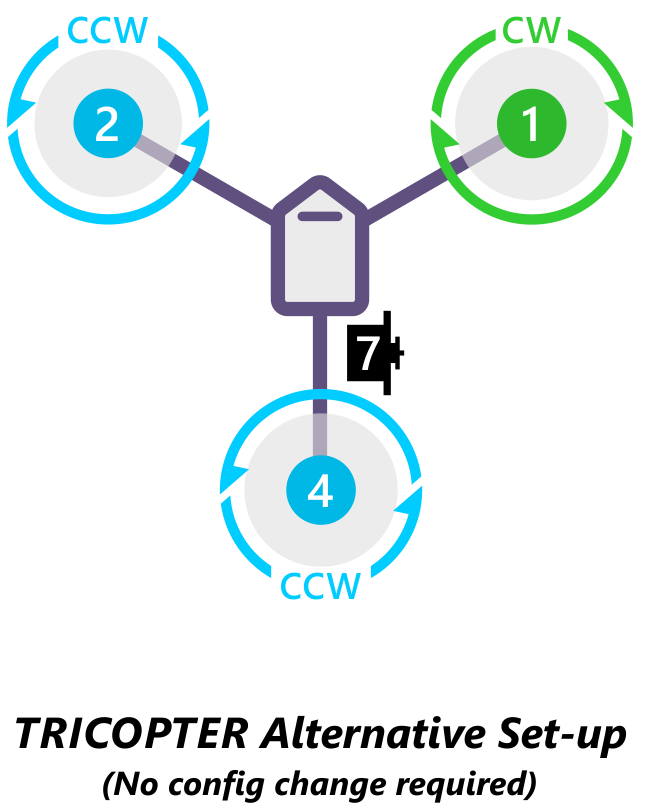
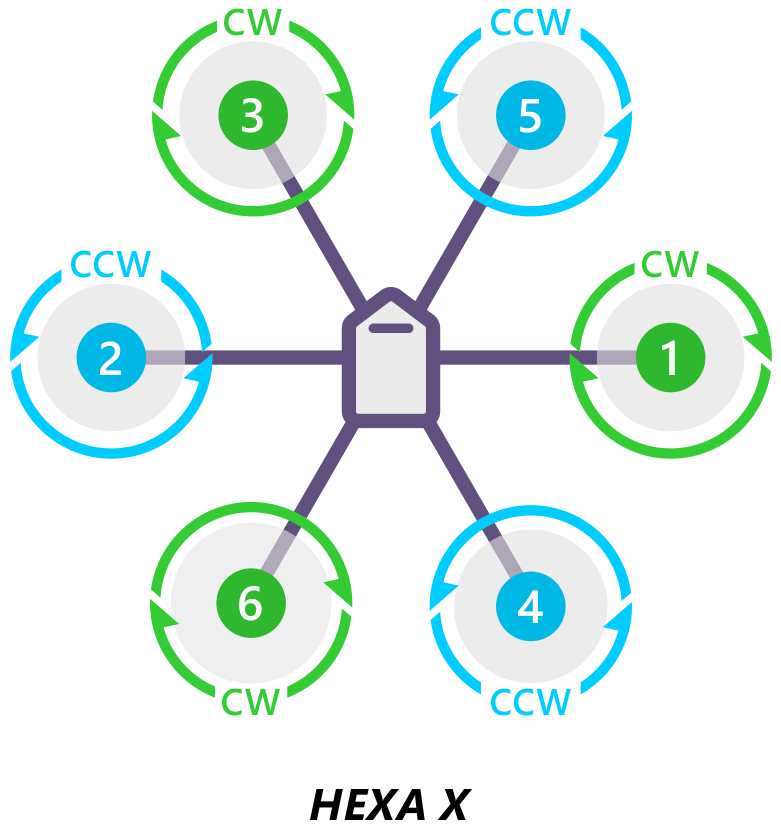
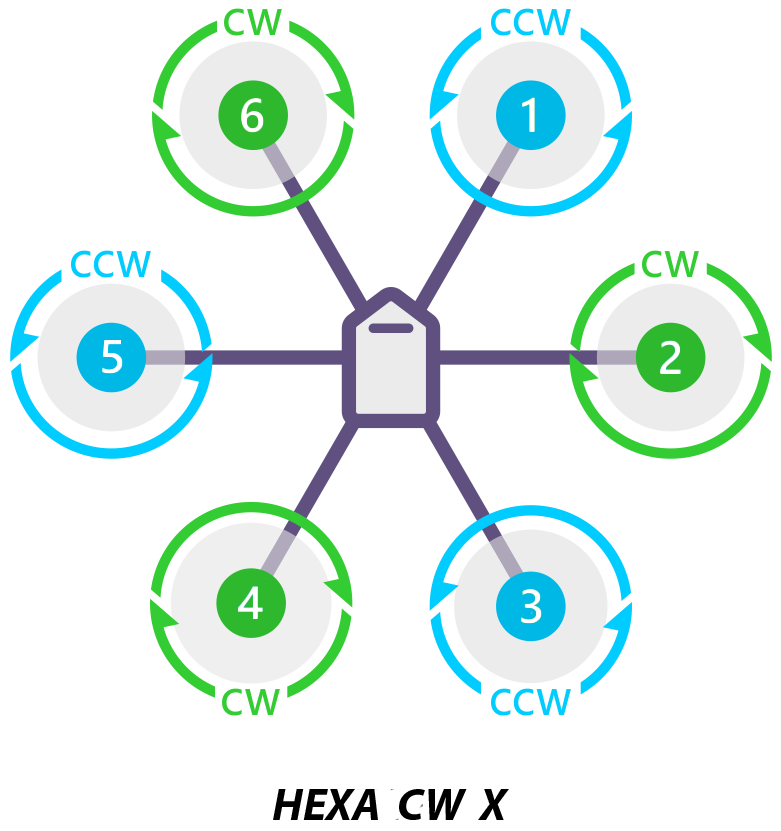
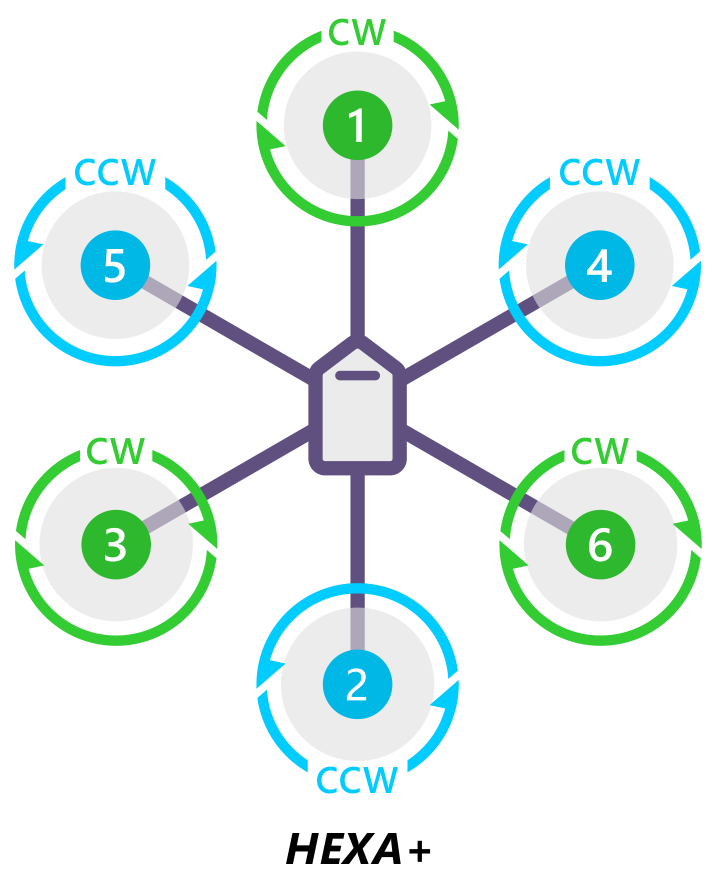
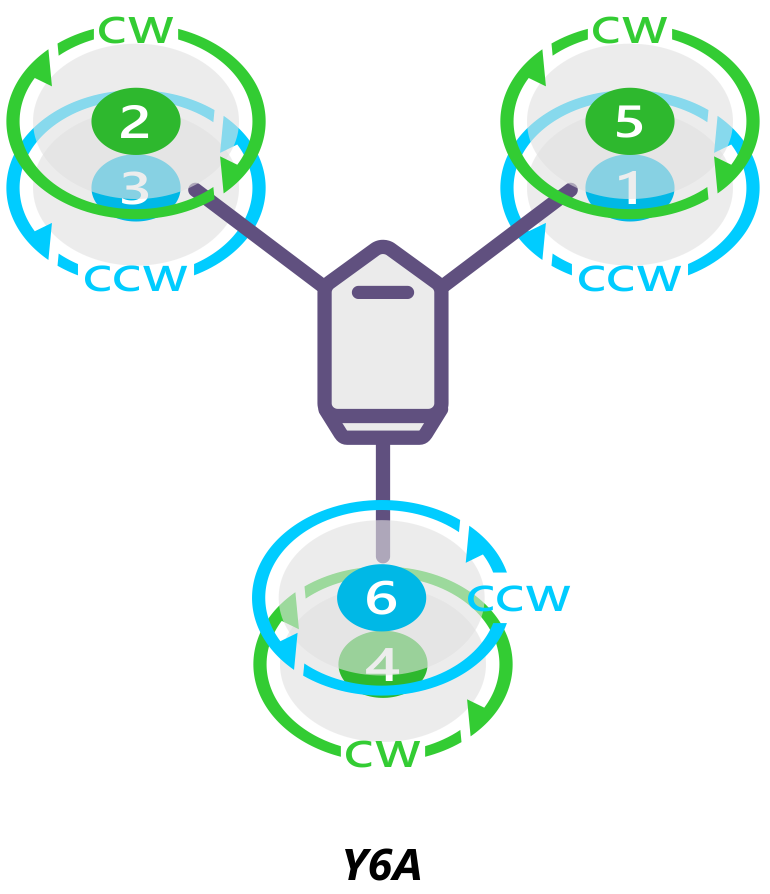
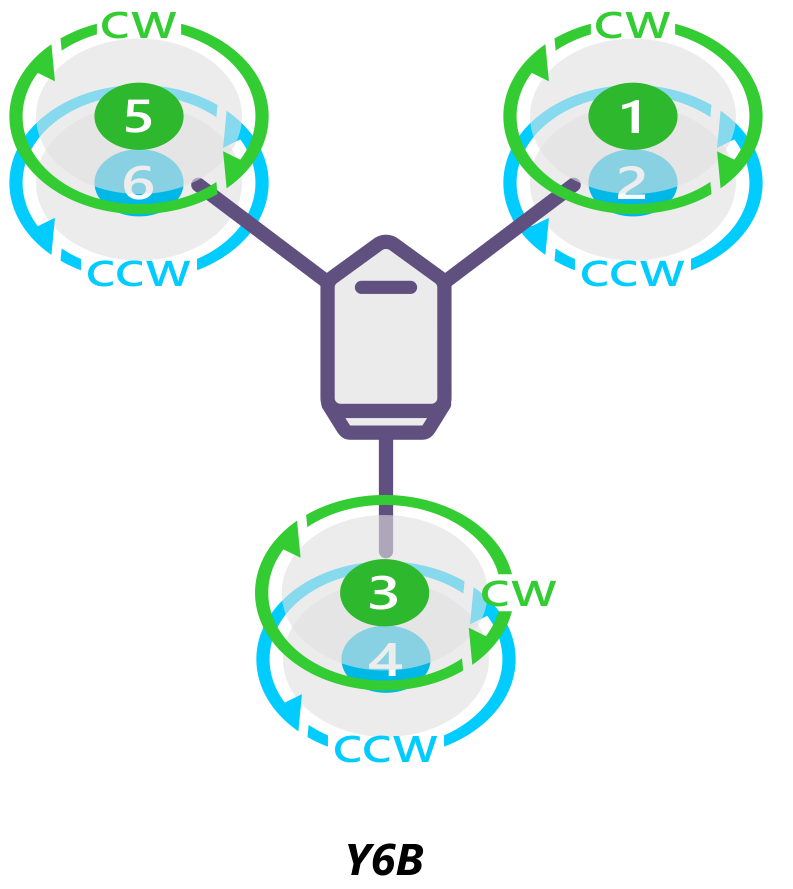
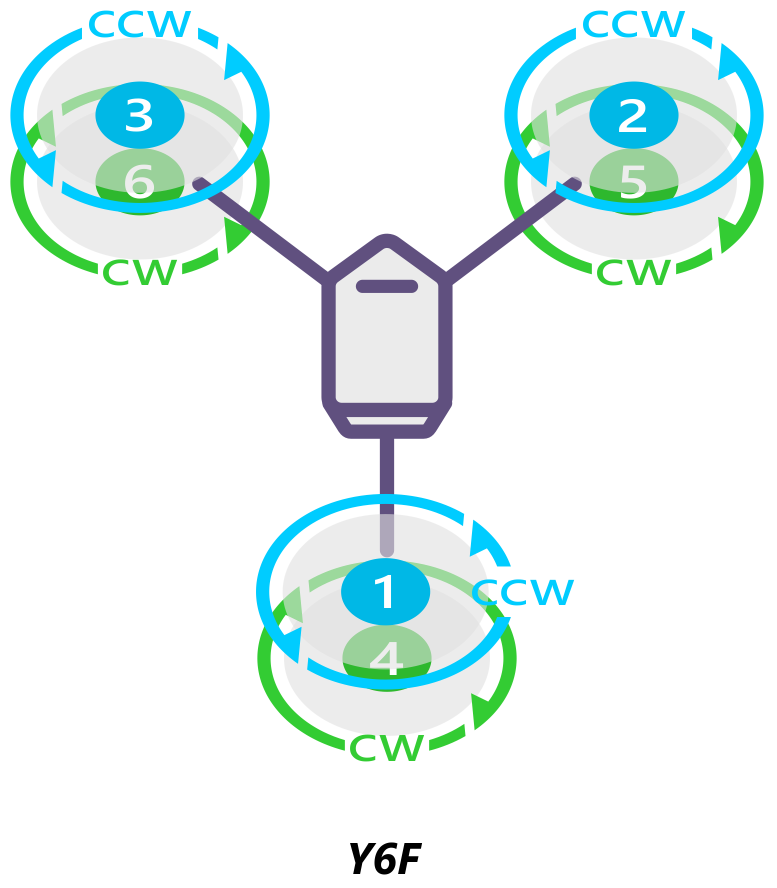
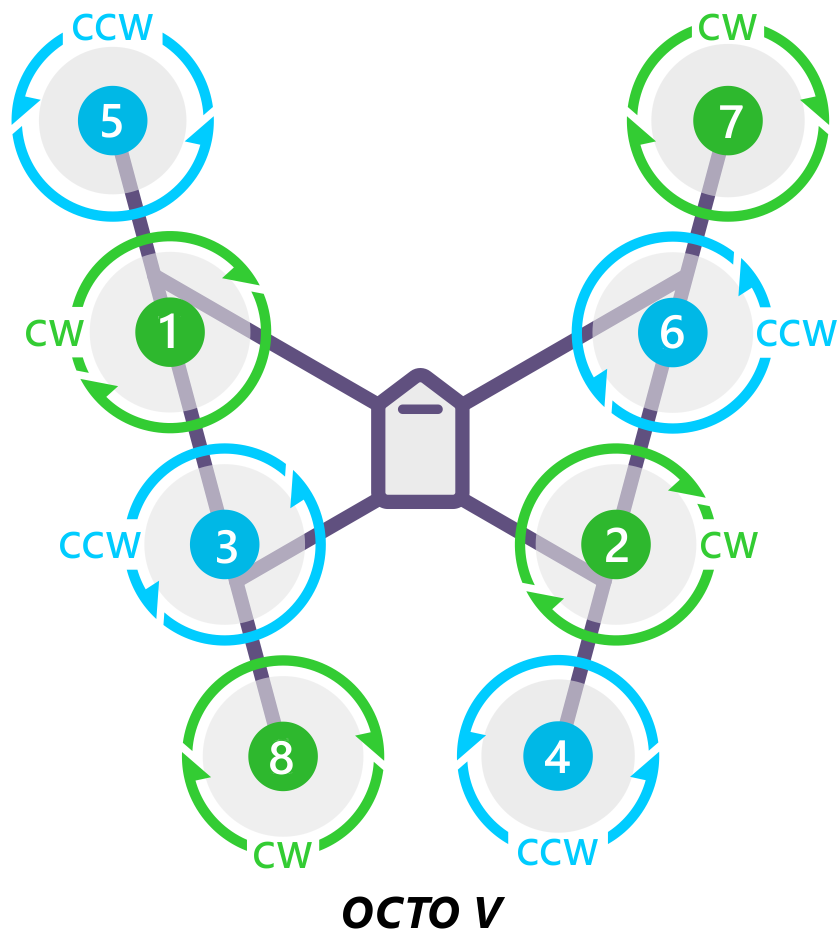
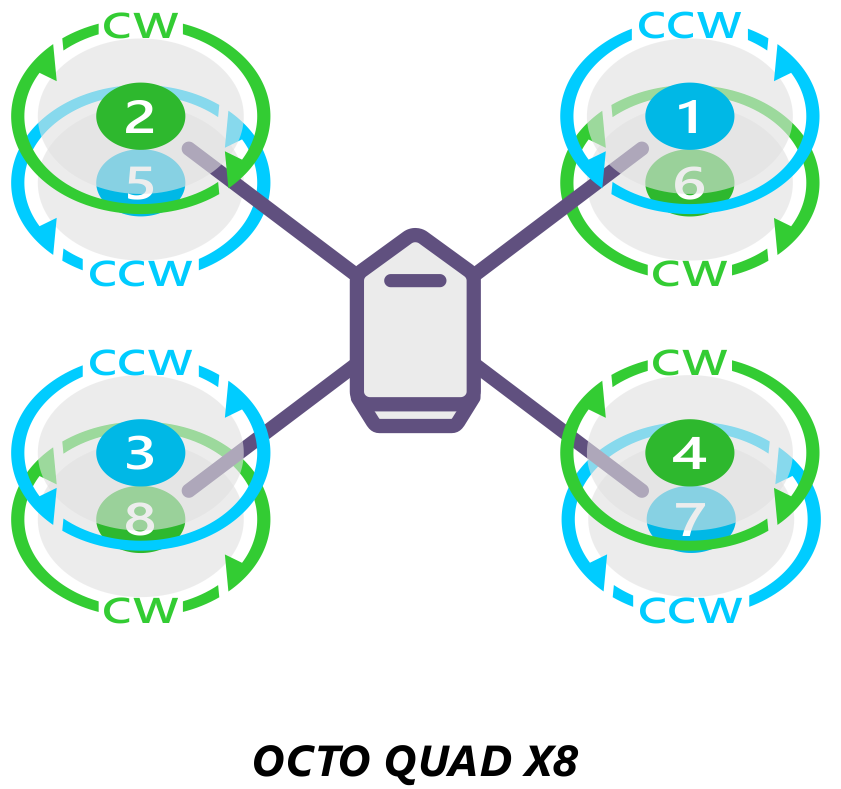
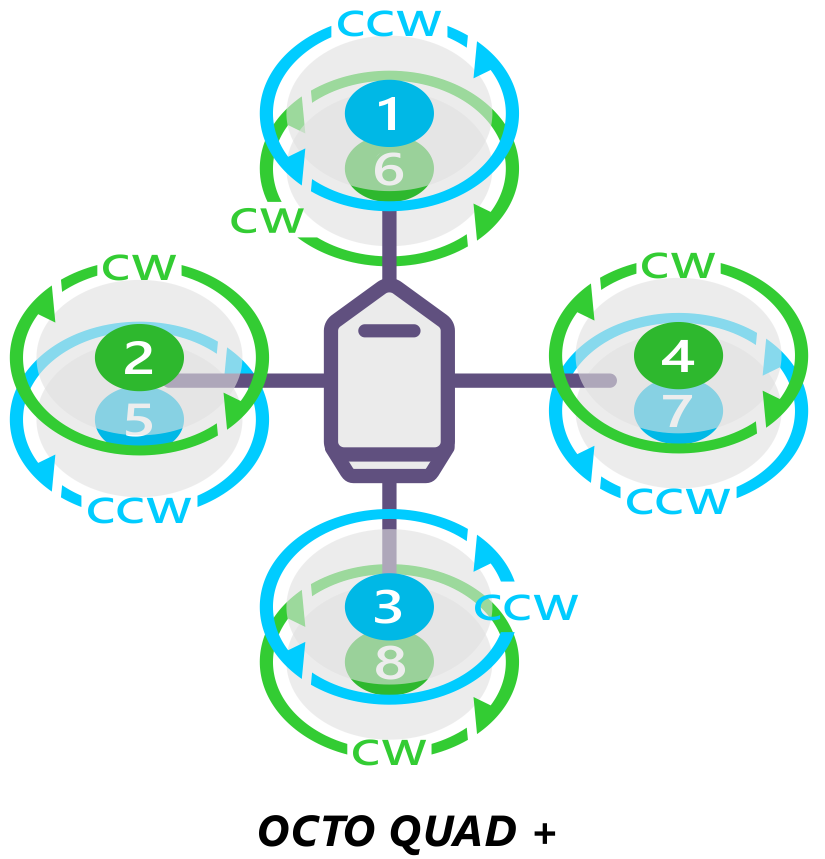
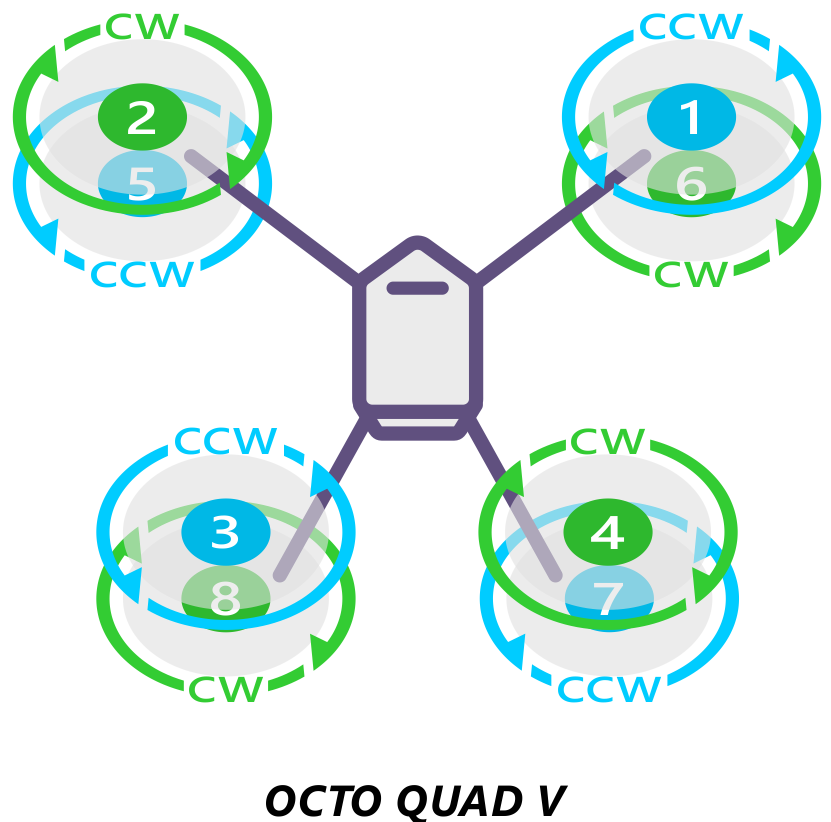
下图显示了每种机架类型的电机顺序。数字表示(飞行)控制器的哪个输出引脚应连接到每个电机/螺旋桨。螺旋桨方向用绿色(顺时针,CW)或蓝色(逆时针,CCW)表示

电机顺序图的图例
四旋翼飞行器


三旋翼飞行器
备注
如果您的尾翼伺服器在响应偏航时方向错误,那么可能是 RCn_REVERSE RC 输入方向或倾斜伺服器的 SERVOn_REVERSE 参数应设置为 1(从 0),请参见 TriCopter 设置页面 详见)。
旋翼飞行器

六旋翼飞行器
Y6
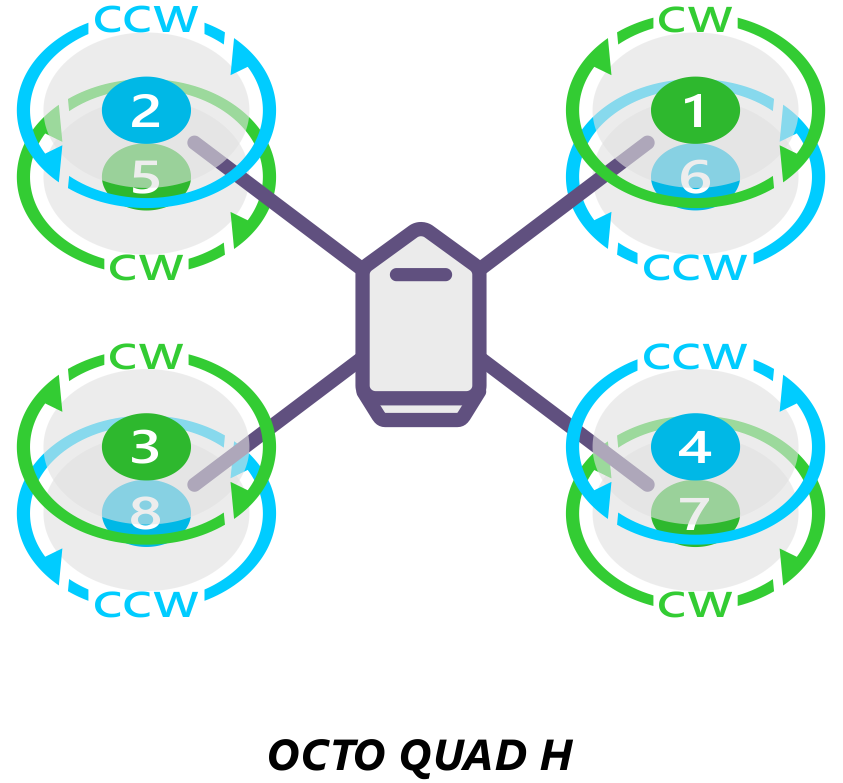
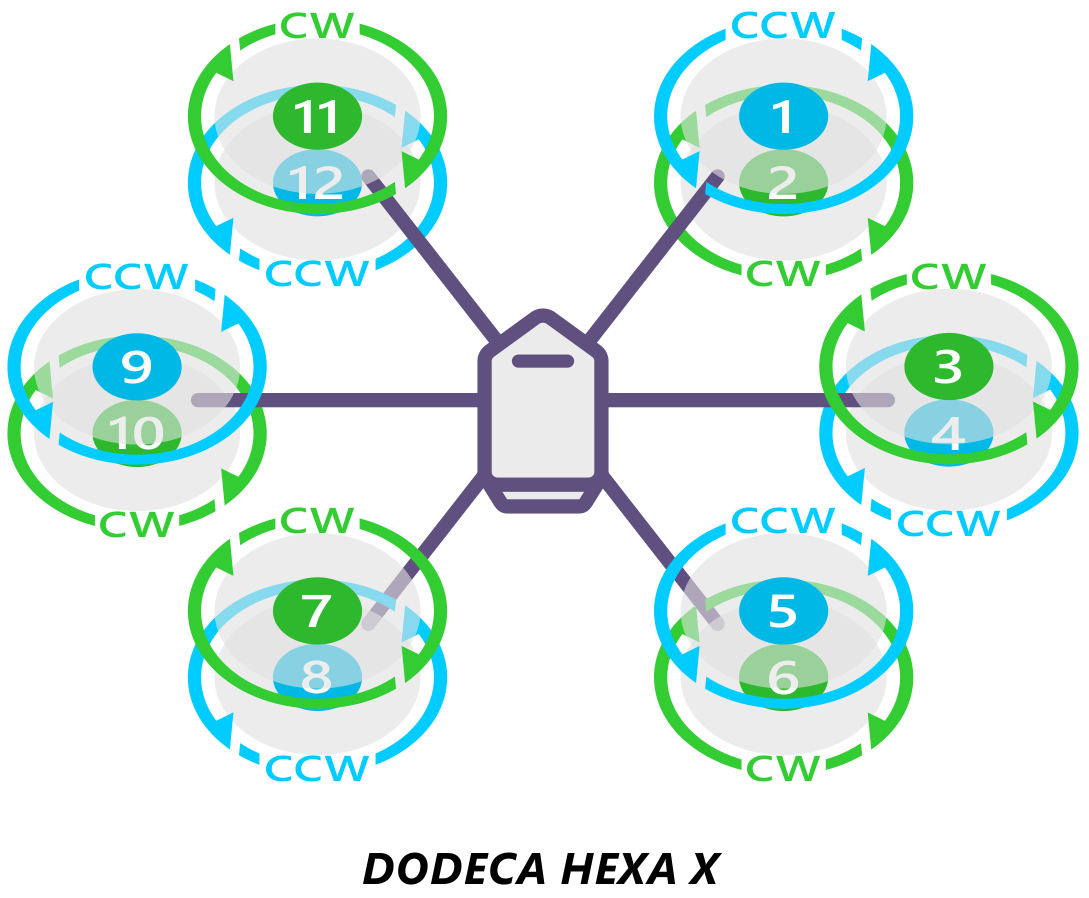
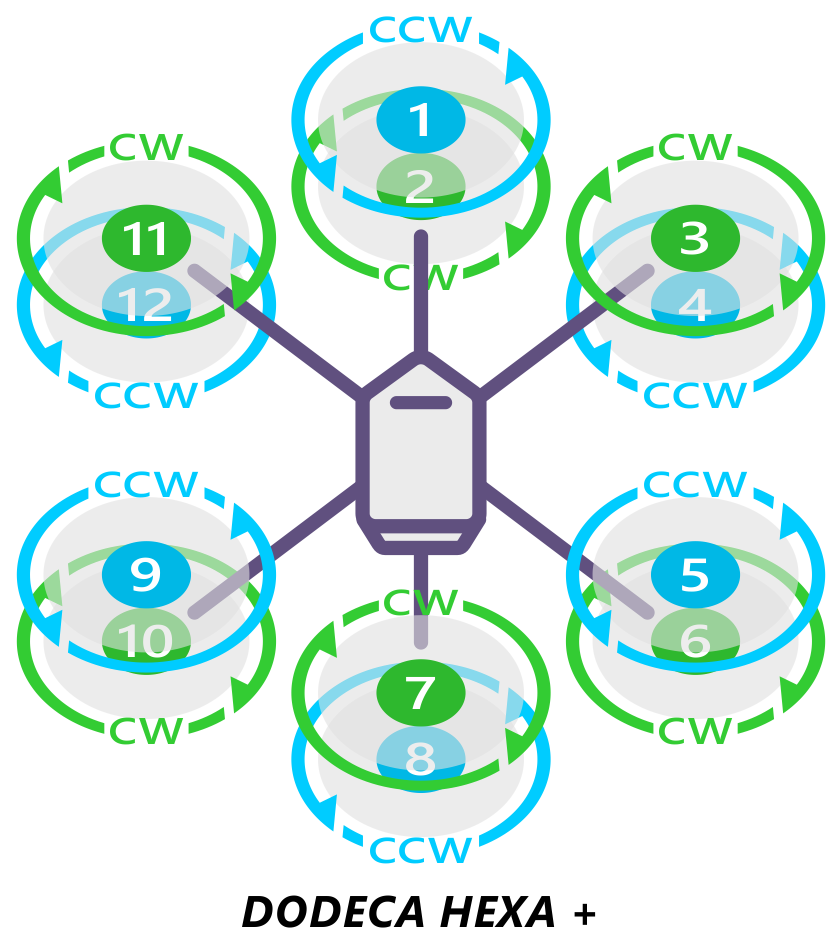
八旋翼飞行器
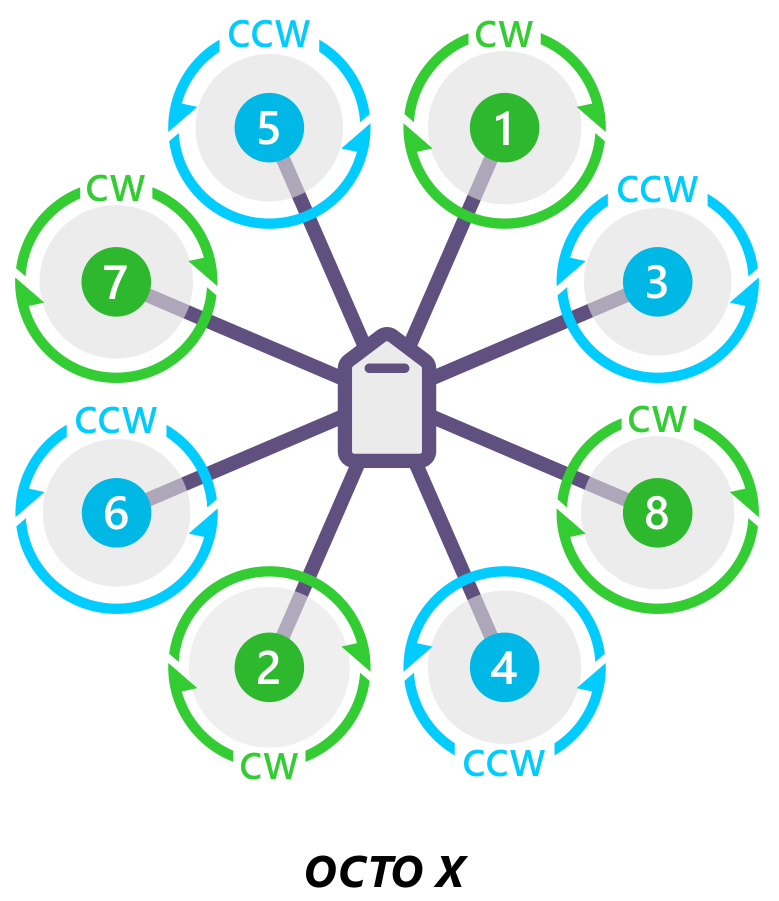
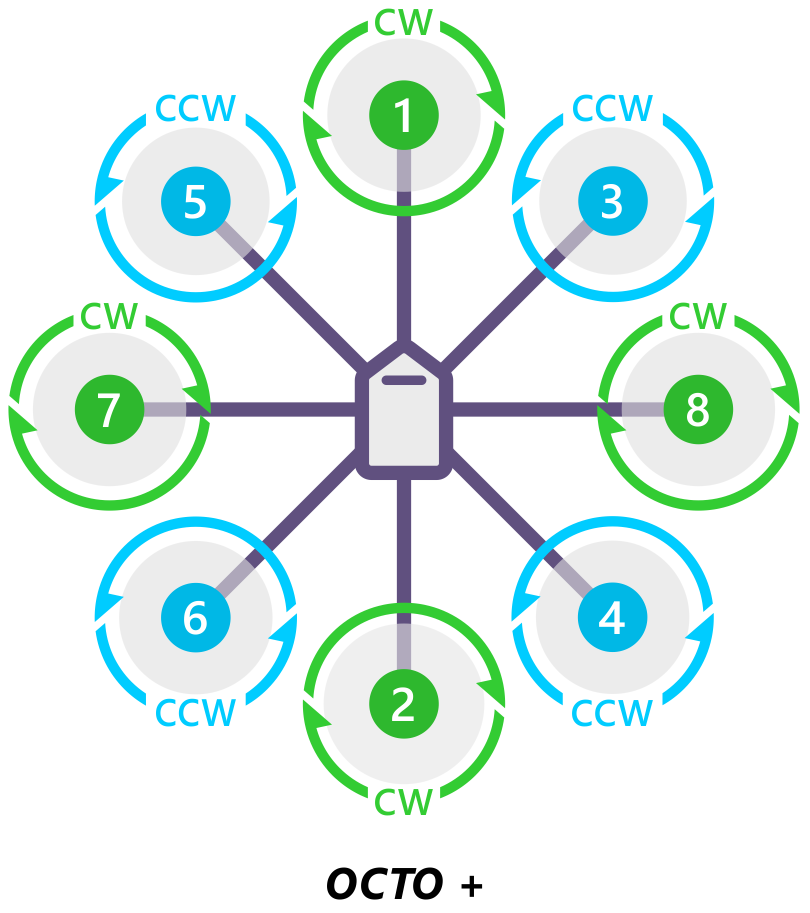
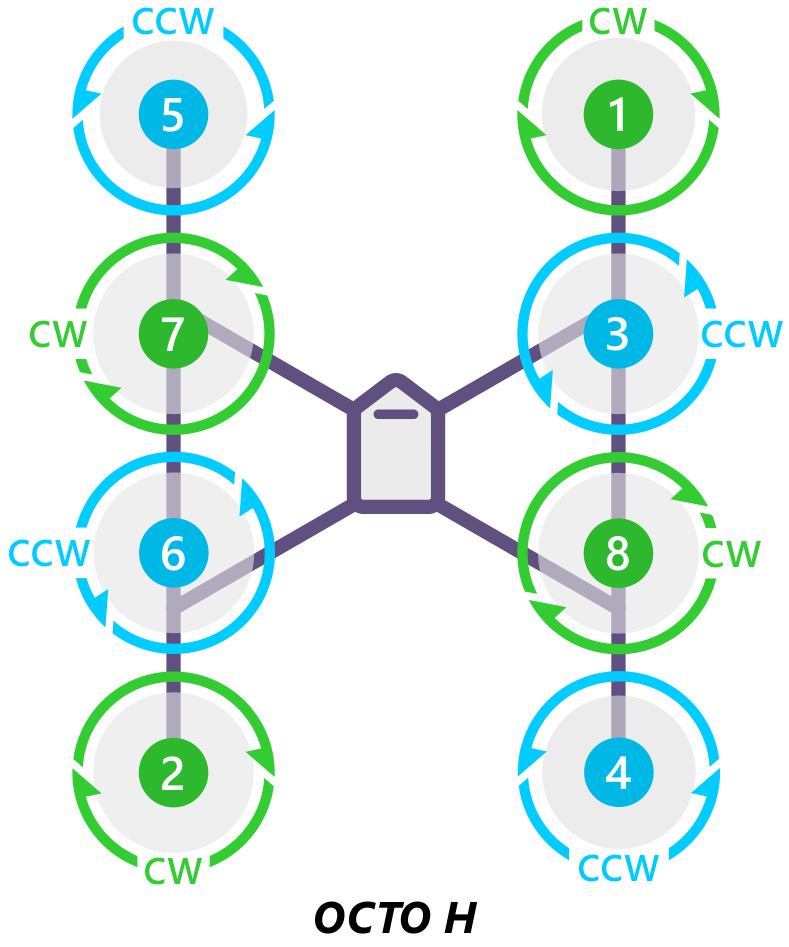
OctoQuad
DodecAexacopter
定制框架
可以使用以下功能配置最多 12 个电机的自定义框架类型 lua 脚本.必须通过脚本计算并加载每个电机的滚动、俯仰和偏航系数。通过设置 框架类别 至 15 - 脚本矩阵。参见: 加四边形示例 和 容错六进制示例.
备注
并非所有(飞行)控制器都支持脚本: 固件限制.
识别顺时针和逆时针螺旋桨
上图显示了两种类型的螺旋桨:顺时针(称为推动器)和逆时针(称为牵引器)。如下图所示,最可靠的方法是通过螺旋桨的形状来识别正确的螺旋桨类型。较厚的边缘是沿旋转方向移动的前缘。后缘是更激进的扇形,通常较薄。 
测试电机旋转方向
如果您已完成 无线电 和 电调校准您可以检查电机的旋转方向是否正确:
确保旋翼飞行器上没有螺旋桨!
打开发射机,确保飞行模式开关设置为 "稳定"。
连接电池。
按住油门和右舵 5 秒钟,上膛旋翼飞行器。
如果在油门向下和向右的情况下无法臂动,并且电机不旋转,则可能未通过臂前安全检查。
预上膛安全检查失败也会通过红色上膛指示灯的双闪和重复闪烁来表示。
如果臂前检查失败,转到 上膛前安全检查页面 并纠正问题或禁用检查,然后再继续。
当您可以成功 Arm 时,施加少量油门,观察并记录每个电机的旋转方向。它们应与上图中所选机架的旋转方向一致。
逆转任何旋转方向错误的电机。
提示
- 只需交换两个
三根电调连接电机的电源线。
使用Mission Planner地面站检查电机编号 电机测试
检查电机连接是否正确的另一种方法是使用Mission Planner地面站初始设置菜单中的 "电机 "测试。
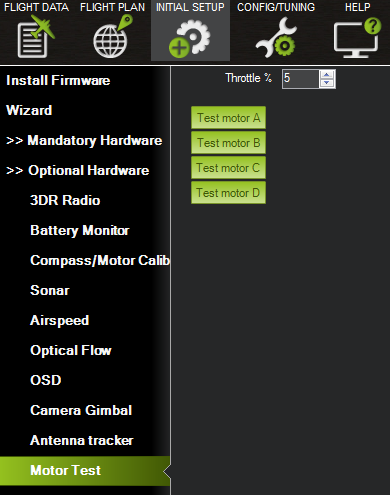
Mission Planner地面站:发动机测试
通过 MAVLink 与载具连接后,您可以点击上图所示的绿色按钮,相应的电机会旋转五秒钟。如下图所示,字母与电机编号相对应。
先脱掉道具!
如果没有电机转动,将 "节流阀/电门 %"调高至 10%,然后再试一次。如果还不行,再试试 15%。
在 + 配置的情况下,第一个旋转的电机将是位于正前方的电机;在 X 配置的情况下,第一个旋转的电机将是位于正前方右侧的电机。然后,电机测试将按顺时针方向旋转。
在 X8 的情况下,它会先让右前上方的电机旋转,然后再让右前下方的电机旋转,并以相同的模式继续旋转。
OctoV 将首先旋转右前电机,然后再旋转一次,按时钟顺序进行,直到旋转到左前电机。
使用配电板
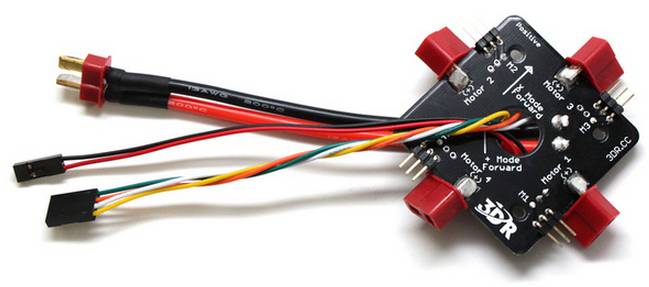
连接电机输出有两种方法。要么将电子调速器 (ESC) 直接连接到(飞行)控制器,要么使用配电板 (PDB)。
使用 PDB 时,按照电机编号将每个电调的电源线 (+)、接地线 (-) 和信号线 (s) 连接到 PDB。在下面查找您的车架类型,以确定电机的分配顺序。然后将信号线从 PDB 连接到(飞行)控制器上的主输出信号引脚(确保电机顺序号与控制器上的主输出引脚号一致)。如果使用电源模块,则可选择将电源线和地线从 PDB 连接到(飞行)控制器电路板。如果您想使用这些电缆作为电源模块的补充或替代,或作为低电流舵机的公共点,请将接地 (-) 线连接到主输出接地 (-) 引脚,将电源 (+) 线连接到主输出电源 (+) 引脚。
KDE(及其他)光隔离式电调
KDEXF-UAS 和 KDEF-UASHV 系列采用光电隔离,不为外围设备提供 BEC 电源输出。它们需要 +5V 电压为光隔离器供电,虽然 Pixhawk 可以通过伺服轨供电,但它不为伺服轨提供 +5V 电压。电调必须由 BEC 或电路板上未使用的连接器上的跳线供电。强烈建议使用 BEC 为轨道供电,而不是使用跳线。
KDE ESC 具有固定的 PWM 范围,因此必须使用计划程序中的 "高级参数 "或 "完整参数设置页 "手动设置每个 PWM 信号的输出范围,使 RCx_MIN 为 1100us 和 RCx_MAX 为 1900us。
Pixhawk 电调问题
据报告,一些电调无法与 Pixhawk 配合使用。
Pixhawk 应能与所有能与普通遥控接收器配合使用的电调配合使用(因为它发送的信号类型相同),但存在以下问题 一个已知的例外是 EMAX ESC.
大多数情况下,问题是由于接线不正确造成的。始终连接信号线和地线。请查看您的电调类型,以决定如何连接 +5V 线路。对于 Pixhawk,必须同时连接信号和信号地线才能使电调工作。
更多信息,请参见 此视频.